How to modify text on design canvas?
ExpenseFast Template Designer: Text Editing Panel
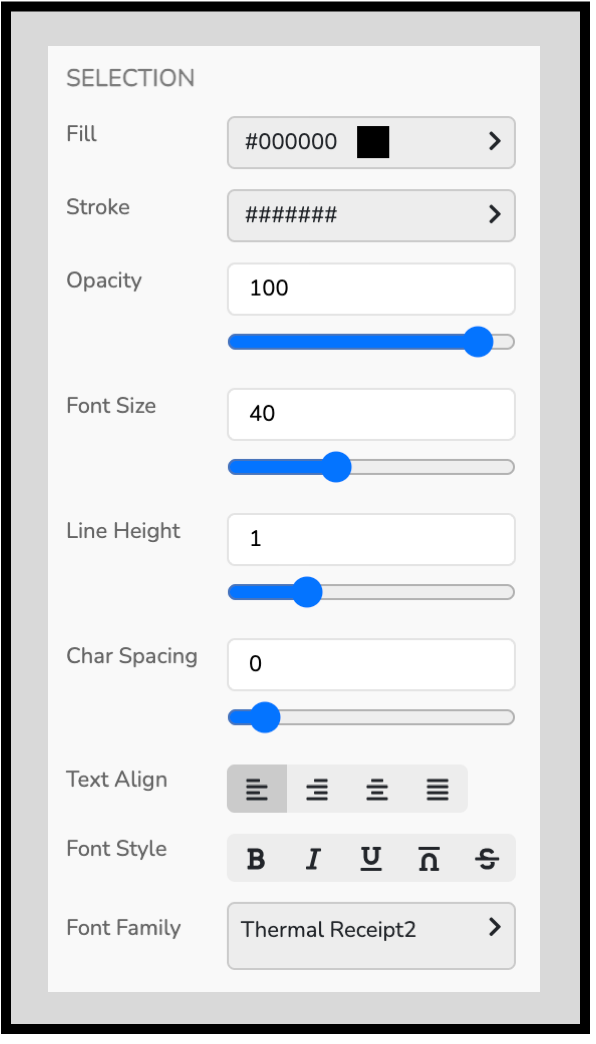
The Text Editing panel lets you style and format text on your template (font, size, spacing, alignment, color, etc.).
This panel only appears when a text object is selected.
When the Text Editing panel shows up
- Click a text object directly on the canvas, or
- Click a text layer in the Layers panel.
Once selected, the Text Editing panel will appear and all changes apply to the currently selected text layer.
Text editing controls
Fill (Text Color)
Sets the main color of the text.
- Enter a hex color (example: #000000) or use the color picker.
- Use this for normal text color changes (black, gray, red, etc.).
Stroke (Outline Color)
Adds an outline (stroke) color around the text.
- Leave blank or unset if you don’t want an outline.
- Useful for making text stand out on darker backgrounds.
Opacity
Controls how transparent the text is.
- 100 = fully solid
- Lower numbers = more transparent
You can type a value or use the slider.
Font Size
Changes the size of the text.
- Enter a number or use the slider.
- Tip: If text looks misaligned on a receipt-style template, small font size changes often fix it quickly.
Line Height
Controls spacing between lines in multi-line text.
- 1 is tight
- Higher numbers add more spacing
Useful for addresses, multi-line descriptions, or item lists.
Char Spacing
Controls spacing between letters (also called letter spacing/tracking).
- 0 = normal spacing
- Positive numbers spread letters out
- Great for matching “receipt printer” spacing or making totals look cleaner.
Text Align
Sets how text lines up inside its text box:
- Left
- Center
- Right
- Justify (stretches lines to align both left and right edges)
Tip: Prices and totals usually look best with Right Align.
Font Style
Quick formatting buttons:
- B = Bold
- I = Italic
- U = Underline
- Overline = line above the text
- Strikethrough = line through the text
(Availability depends on the selected font.)
Font Family
Choose the font used for the selected text.
- Click the font dropdown to pick another font (example shown: “Thermal Receipt2”).
- Tip: Receipt templates often look most realistic with a thermal/mono-style font.
Tips for faster editing
- If you don’t see the Text Editing panel, you likely have a non-text layer selected (like a rectangle or image). Click a text layer and try again.
- Use Opacity instead of light gray if you want text that looks faint but still “printed.”
- Use Line Height + Char Spacing together to match the look of real receipts.